Pages


Monday, May 1, 2023

Our Final Collection of the 2022-2023 School Year!!!!


HELLO SPRING!!!!!

We have arrived to the end of the school year with Prom behind us and Grad Nite and Graduation on the horizon.  We are in the midst of AP exams and finalizing some big decisions.  But, before we do all that we have our last collection of writers to read.

I have combined the last two groups for this month and there is a lot of submissions.  PLEASE, read ALL 16 in the collection.  Choose 5 this time!!! Yes, you read that correctly...5.  These can be your favorites or ones you find unusual and/or intriguing.  Leave your comments either here on the BLOG or on Canvas on the Discussion Board.  You have until Wednesday, May 17 to complete ALL of your comments.

If you are a writer for either March or April, you only have to complete comments for 3 submissions.  If you want to do more, you may.  You do not have choose from your month. You may pick from either one.

Class of 2023,

I want to take a moment to THANK all of you for your contribution to our class Blog. Many of you took risks in your writing. Some took on the challenge of writing about your passions and topics of interest. A lot of you shared your talented How To's and yummy recipes, and some of you shared your favorite books with us.  Your "you" is here on the Blog and will stay here for you to visit when you need to FEED YOUR SOUL.

I have enjoyed OUR time together in this class.  I hope you have as well. Thank you for sharing YOU with me and all of us--your "goodies", your pictures, your hopes and dreams, your beliefs, your plans for the weekend, your plans for the future, your sonnets, your found poems, your laughter, your hellos and goodbyes, your smiles and frowns, your serious side and your silly side. You have added another year to my career. You give me my PURPOSE and my WHY.

Remember self care. You are an ever evolving human. Take care of YOU. Be KIND to YOU.  Always.

Don't be a stranger.  Our paths may cross again in the future.  Until then, enjoy these last few weeks of your senior year. Finish strong.

Be Still. Breathe. Live. Create.

All my love,

Mrs. Solano

xo

Shame--Lorelei


It was October of 2010 when I was selected as the Student of the Month of my small Kindergarten class of 28 people. As a reward, I was given a blank “All-About-Me” poster template to fill in with my hobbies, family members, and favorite songs and foods and toys. I was ecstatic to share all my interests with all my new friends I had made in the past few months. While presenting the poster, I got through my family members, hobbies, and favorite songs with content approval from my peers and my teacher. I arrived to present my favorite food, and confidently said with my crooked small smile, “My favorite food is ramen noodles.” The class’ approval quickly converted to glances of confusion or disgust amongst a silence in the classroom that had ironically echoed in my mind. My teacher said hesitantly, “Ramen? That’s… interesting.” Prior to this, the other students in class would typically choose pizza, cheeseburgers, or ice cream as their favorite dish. The feeling of shame had washed over me for feeling proud of this Asian dish. This same feeling had prolonged in my heart for years to come in which I had to continually lie on the repetitive question on what my favorite food was, to which I’d now reply with “pizza”, “cheeseburgers”, or “ice cream”. 

Shame is defined as “a painful feeling of humiliation or distress caused by the consciousness of wrong or foolish behavior” (Oxford). Although this experience had seemed minor, this flashbulb memory had significantly marked my first introduction to feeling like my Asian identity was something to be considered as foolish. Growing up, I tried to conform to a predominantly white favored society which had led to the extreme efforts to deviate away from my Asian culture. However, as I approached more recent years, I found comfort in Asian diasporas in middle school and high school that struggled with this same feat, but found myself in the dilemma of not being Asian enough for having tried to erase my Asian identity as a child, yet being too Asian to be able to “fit” in with the society surrounding me.

Shame in society has been deemed to be the roots of one's insecurities in their character. Yet the irony of the concept of shame is the fact that shame is actually rooted in the judgment of others, for without such judgment, we would never know what to assume shameful or not. The societal perceptions of shame are incorrectly attributed to the faults of one’s character, but in many cases, this is just another example of victim blaming. Although people should be ashamed of their actions when acting ethically or morally incorrectly, current day views of shame are elevated to where people are unable to feel secure in their character without being shamed. It's shameful for a woman to wear a short skirt, but not shameful for the predator to view her in such a way in the first place. It's shameful for a man to show his emotions, but it's not shameful for society for instilling such standards. Shame should not be used to define social conformities and double standards. The modern day development of shame has altered people into deindividuation and conformity, which is a betrayal to one’s culture, beliefs, or lifestyle. Our idea of shame in today’s world is representative of society’s developing absence of empathy and individualism. 

If used effectively, shame can actually be used to better society, by acting as a way to uphold social order and separate right from wrong rather than to be used as a means of social approval and stagnation. In such a world where we lack empathy and openness to differences, it’s necessary to push towards a world where shame is not rooted in the fault of the victims. A world of equity and appreciation for individualism. A world where cultural differences are not seen as humiliating. A world where my favorite food truly can be ramen noodles. 


Source: “Oxford Languages and Google - English.” Oxford Languages, https://languages.oup.com/google-dictionary-en/.

How To Design a Yearbook Spread--Jillian


Creating a book full of memories that students make throughout the year is not as easy as it sounds. One may believe that pasting a bunch of images on some pages is all it takes, but it is much more than that. Everything about the yearbooks we make are from the ideas of our Yearbook Staff. From the theme of the book, to the page layouts, and the writing pieces are all student-produced. As I have been a part of the yearbook-producing process since the seventh grade, I am quite accustomed to how the production works. I started designing page layouts, also known as spreads, since my sophomore year. One may think that it is an easy job, but it becomes very challenging when you have to design the whole book of at least 300 pages. Each spread is designed with thought about what will go on those pages, how much content we have for it as a staff, and its correlation to the theme. While it took me awhile to adjust my brain to design spreads based on this criteria, anyone can design spreads with the steps given to them. 


In order to design a yearbook spread, you will need a program, or software, that provides all sorts of tools, image placeholders, shapes, and texts, as well as an imagination. 


   1. Understand what type of spread you are designing before beginning. Types of spreads vary from dividers, sports, activities, clubs, and more. In this tutorial, I am going to design a sports spread. Sports spreads typically have more pictorial content, rather than a statistic or infographic about that sport’s season. This means that the spread should be filled with lots of pictures and lots of room for writing about that sports game, match, race, etc. 

    2. Begin designing the spread with the dominant photo. The dominant photo is the largest picture on that spread with a purpose of catching the viewer’s attention. Place a large photo anywhere on the spread, while simultaneously leaving space for other pictures and captions.


When learning how to design, it was a challenge to find out specific sizes for the dominant photo that did and didn’t work. Designing takes a lot of time and experimenting with different shapes and forms, which is what I learned to like about it. I used to dread making every single layout vary from each other, while also making it look clean. Now, I understand that the time it takes to make a spread is crucial to producing one that is visually appealing. 

    3. Next, place images of smaller sizes next to the dominant to create what I call a “Dominant Package.” Dominant packages consist of a dominant photo next to a smaller set of photos to be the main highlight of the spread. For example, if a sport won CIF, those pictures would be in the dominant package. These photos tell the story of what best happened during that season.


    4. Then, create your first module, starting with placing more imageholders. Modules are groups of photos that are correlated to each other to provide another view of the sport on the spread. For example, if the main highlight of a sport was that they won CIF, a module would be the team players practicing. The Yearbook Staff’s purpose is to cover as much content as we can to create pages full of memories throughout the year. By designing space for modules, it allows the staff members to write more about the sport.


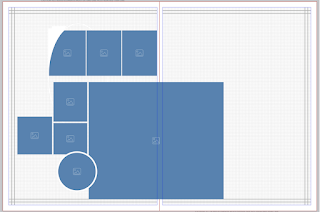
    5. Create your second module with the space that you have left. Be sure to leave some room for the text boxes, so that the spread is not just pictures. Modules can vary in all types of forms, it is up to your imagination to lay out what you envision your spread to look like. The left module has three photos and the right module has six photos. In my opinion, spreads with more photos are better-looking to the eye. 
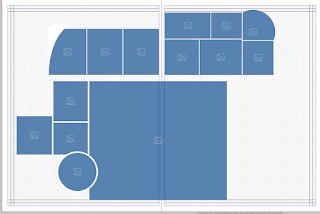
If you haven’t noticed yet, I have three curvy-shaped image placeholders. This year’s yearbook theme relates to have three circular design elements throughout the book. I incorporated these design elements through the shape of photos. This portrays the importance of having a stable and understandable theme to be able to fit the layouts of every single spread in the book. Though the yearbook is supposed to be a surprise as a whole, here’s a sneak peak to what a general sports spread looks like. Keep it a secret!


    6. Finally, add some text onto the page, beginning with the “Story Package.” The story package consists of a headline, a sub-headline, and the story for that spread. Stories on sports spreads typically are written about the main highlights of that sport for that specific season. Thought the pictures showcase the highlights of the sport, the story’s purpose is to give more in-depth information, for history purposes.


    7. Continue to add more text to the spread so that the viewers know more context about the photo. Each photo needs captions to tell the complete story. There are two types of captions, regular captions and story captions. Regular captions are the plain captions that describe a photo each. Story captions describe a module of photos as whole. Modules that have story captions include tag lines on each photo that name each student. Both types of captions are used throughout spreads in the yearbook. 

Every module should have a headline, just like how every story needs a headline. Module headlines are used to differentiate the type of content from the rest of the page.


    8. Lastly, do not forget to place your folio and your by-lines on both bottom corners of the spread. Folios are the page numbers and by-lines credit those who designed the spread and who inputs content on the spread.


Now you know how yearbook spreads are designed. It takes practice to create a decent-looking layout, but becomes easy once you master it. I enjoy making layouts because I am a visual learner. I love all things organized, laid out, and clean, which is why designing yearbook spreads has led to a passion in making layouts for everything. I have lots of fun with drawing and organizing various types of layouts, which I thank being a part of the Yearbook Staff for.


How To Propagate--Aneesa


Hi everyone! My blog post will be on plant propagation. Plant propagation can come in forms, such as attaching two plants, such as succulents and cacti, to create a conjoint plant; the other propagation is water propagation, which I will show. Water propagation occurs when a plant clipping is placed in water and roots grow. Once the roots are produced, the plant can continue growing in water or soil. The best time to propagate plants is during Spring through Summer; this gives them enough light for the roots to grow!

 First Step: Choose a house plant that has multiple leaves and stems. The best indoor plants for this are pothos, African violets, the prayer plant, and philodendron, but other plants, such as string of pearls, can also work. For this example, I am using a pothos plant that my grandma started growing, and my mom and I have continued propagating it over the years.


Second Step: Once you have chosen which leaf of the plant you want to cut, look for a root node. The root node is a little bud on the stem that will connect a leaf to the stem once it starts growing. Cut about 4-6 inches from the node.


Third Step: Get a small vase, cup, or plant propagation stand and fill it with water. Place the cutting into the cup and ensure only the stem is submerged- not the leaves. Place the cutting into a sunny spot and wait for it to grow!


Fourth Step: Consistently fill the cup with the water; the sample can quickly absorb the water and the water constantly evaporates. Once in a while, you can also replace the water in the cup once every few days to a week if the water becomes murky.


Fifth Step: Once you see little roots growing out of the stem, you can plant the cutting in soil! Consistently water it and give it nutrients so it can thrive. If you want it to continue growing in water, make sure to give it liquid nutrients and change the water.


I hope you enjoyed this tutorial and try out propagation! Propagation is a great tool to have more houseplants without spending money on buying multiple houseplants. Propagation can also work with fruits and vegetables, the process is called aquaponics/hydroponics- allowing the plant to grow and produce without soil. It is a great tool, especially with climate change and industrial farming causing harm to soil; it is also helpful to people living in urban areas without quick access to fresh produce.