Pages


Showing posts with label "How To" Senior Featured Writer. Show all posts

Monday, May 1, 2023

How To Design a Yearbook Spread--Jillian


Creating a book full of memories that students make throughout the year is not as easy as it sounds. One may believe that pasting a bunch of images on some pages is all it takes, but it is much more than that. Everything about the yearbooks we make are from the ideas of our Yearbook Staff. From the theme of the book, to the page layouts, and the writing pieces are all student-produced. As I have been a part of the yearbook-producing process since the seventh grade, I am quite accustomed to how the production works. I started designing page layouts, also known as spreads, since my sophomore year. One may think that it is an easy job, but it becomes very challenging when you have to design the whole book of at least 300 pages. Each spread is designed with thought about what will go on those pages, how much content we have for it as a staff, and its correlation to the theme. While it took me awhile to adjust my brain to design spreads based on this criteria, anyone can design spreads with the steps given to them. 


In order to design a yearbook spread, you will need a program, or software, that provides all sorts of tools, image placeholders, shapes, and texts, as well as an imagination. 


   1. Understand what type of spread you are designing before beginning. Types of spreads vary from dividers, sports, activities, clubs, and more. In this tutorial, I am going to design a sports spread. Sports spreads typically have more pictorial content, rather than a statistic or infographic about that sport’s season. This means that the spread should be filled with lots of pictures and lots of room for writing about that sports game, match, race, etc. 

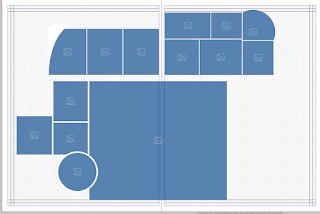
    2. Begin designing the spread with the dominant photo. The dominant photo is the largest picture on that spread with a purpose of catching the viewer’s attention. Place a large photo anywhere on the spread, while simultaneously leaving space for other pictures and captions.


When learning how to design, it was a challenge to find out specific sizes for the dominant photo that did and didn’t work. Designing takes a lot of time and experimenting with different shapes and forms, which is what I learned to like about it. I used to dread making every single layout vary from each other, while also making it look clean. Now, I understand that the time it takes to make a spread is crucial to producing one that is visually appealing. 

    3. Next, place images of smaller sizes next to the dominant to create what I call a “Dominant Package.” Dominant packages consist of a dominant photo next to a smaller set of photos to be the main highlight of the spread. For example, if a sport won CIF, those pictures would be in the dominant package. These photos tell the story of what best happened during that season.


    4. Then, create your first module, starting with placing more imageholders. Modules are groups of photos that are correlated to each other to provide another view of the sport on the spread. For example, if the main highlight of a sport was that they won CIF, a module would be the team players practicing. The Yearbook Staff’s purpose is to cover as much content as we can to create pages full of memories throughout the year. By designing space for modules, it allows the staff members to write more about the sport.


    5. Create your second module with the space that you have left. Be sure to leave some room for the text boxes, so that the spread is not just pictures. Modules can vary in all types of forms, it is up to your imagination to lay out what you envision your spread to look like. The left module has three photos and the right module has six photos. In my opinion, spreads with more photos are better-looking to the eye. If you haven’t noticed yet, I have three curvy-shaped image placeholders. This year’s yearbook theme relates to have three circular design elements throughout the book. I incorporated these design elements through the shape of photos. This portrays the importance of having a stable and understandable theme to be able to fit the layouts of every single spread in the book. Though the yearbook is supposed to be a surprise as a whole, here’s a sneak peak to what a general sports spread looks like. Keep it a secret!


    6. Finally, add some text onto the page, beginning with the “Story Package.” The story package consists of a headline, a sub-headline, and the story for that spread. Stories on sports spreads typically are written about the main highlights of that sport for that specific season. Thought the pictures showcase the highlights of the sport, the story’s purpose is to give more in-depth information, for history purposes.


    7. Continue to add more text to the spread so that the viewers know more context about the photo. Each photo needs captions to tell the complete story. There are two types of captions, regular captions and story captions. Regular captions are the plain captions that describe a photo each. Story captions describe a module of photos as whole. Modules that have story captions include tag lines on each photo that name each student. Both types of captions are used throughout spreads in the yearbook. 

Every module should have a headline, just like how every story needs a headline. Module headlines are used to differentiate the type of content from the rest of the page.


    8. Lastly, do not forget to place your folio and your by-lines on both bottom corners of the spread. Folios are the page numbers and by-lines credit those who designed the spread and who inputs content on the spread.


Now you know how yearbook spreads are designed. It takes practice to create a decent-looking layout, but becomes easy once you master it. I enjoy making layouts because I am a visual learner. I love all things organized, laid out, and clean, which is why designing yearbook spreads has led to a passion in making layouts for everything. I have lots of fun with drawing and organizing various types of layouts, which I thank being a part of the Yearbook Staff for.


How To Propagate--Aneesa


Hi everyone! My blog post will be on plant propagation. Plant propagation can come in forms, such as attaching two plants, such as succulents and cacti, to create a conjoint plant; the other propagation is water propagation, which I will show. Water propagation occurs when a plant clipping is placed in water and roots grow. Once the roots are produced, the plant can continue growing in water or soil. The best time to propagate plants is during Spring through Summer; this gives them enough light for the roots to grow!

 First Step: Choose a house plant that has multiple leaves and stems. The best indoor plants for this are pothos, African violets, the prayer plant, and philodendron, but other plants, such as string of pearls, can also work. For this example, I am using a pothos plant that my grandma started growing, and my mom and I have continued propagating it over the years.


Second Step: Once you have chosen which leaf of the plant you want to cut, look for a root node. The root node is a little bud on the stem that will connect a leaf to the stem once it starts growing. Cut about 4-6 inches from the node.


Third Step: Get a small vase, cup, or plant propagation stand and fill it with water. Place the cutting into the cup and ensure only the stem is submerged- not the leaves. Place the cutting into a sunny spot and wait for it to grow!


Fourth Step: Consistently fill the cup with the water; the sample can quickly absorb the water and the water constantly evaporates. Once in a while, you can also replace the water in the cup once every few days to a week if the water becomes murky.


Fifth Step: Once you see little roots growing out of the stem, you can plant the cutting in soil! Consistently water it and give it nutrients so it can thrive. If you want it to continue growing in water, make sure to give it liquid nutrients and change the water.


I hope you enjoyed this tutorial and try out propagation! Propagation is a great tool to have more houseplants without spending money on buying multiple houseplants. Propagation can also work with fruits and vegetables, the process is called aquaponics/hydroponics- allowing the plant to grow and produce without soil. It is a great tool, especially with climate change and industrial farming causing harm to soil; it is also helpful to people living in urban areas without quick access to fresh produce.

Sunday, April 30, 2023

How To Grow Your Natural Nails--Anais


    Growing up, I struggled with mental health issues such as anxiety. One of the ways I saw it manifest was in the form of nail-biting, a story some of you may know all too well. It was a habit I worked hard to leave behind in my childhood as I moved forward to more healthy coping mechanisms. While I haven’t exactly conquered my anxiety, because, after all, this is simply a nail tutorial, as I put more time into doing my nails, I find that taking care of them is also a way of taking care of myself. Though putting on a fake nail or getting long acrylics done may be easier than spending four months growing your nails out, I personally love having natural nails for that vampire look, and it’s a plus that I can also save some money by doing my nails at home. Even if you don't find this how-to useful for furthering your own goals, I encourage everyone reading to find ways to self-care and relax!

Materials: 
● Glass nail filer 
● Empty brush tip pen or empty nail polish container 
● Jojoba oil 
● Vitamin E oil 
● Rubber base gel polish or builder gel polish 
● UV Lamp 

Part I: Shaping 
Step 1 is choosing the correct nail shape. Even if your nails are short, choosing a good shape now will ensure the rest of the nail growth journey will be smooth. Any shape with sharp corners, such as square or coffin, is more prone to chipping as the corners can get caught on objects. That’s why I highly recommend squoval, oval, or almond for at least during the growth stage.

https://www.vectorstock.com/royalty-free-vector/set-of-nails-shapes-vector-19608413

Step 2 is filing your nails in the correct way. You want to avoid using nail cutters as they may splinter the nail. The best nail filers to use are glass nail filers, which are also washable and reusable. These filers will leave a fine sanding on your nails, which therefore will leave smoother edges that won’t split or snag. When using your file, move in long, one-directional strokes, not short see-saw movements. If you have a lot of growth to file, then using a more heavy-duty filer such as a metal filer is fine to remove the bulk, but return to a glass filer for the finishing touches.


Part II: Nail Care 

Step 3 is using nail oil. Nail oil will hydrate your nails and your cuticles as dry nails are prone to snapping, whereas moisturized nails will flex. I use a ¾ mix of jojoba oil with ¼ vitamin E oil. Jojoba oil is the most similar to the oil our skin naturally produces, so jojoba will absorb the best while vitamin E is anti-bacterial and will thicken up the nail solution. I put my mixture into a nail brush pen for easier application, but an empty nail polish container will also work. I apply this oil on my nails at least three times a day on my cuticles and the underside of my nails. If you don’t have access to these materials, using store-bought cuticle oil, hand lotion, or even vaseline can also work. 


Step 4 is being careful with your hands. Having long nails essentially means you have an extra few centimeters on your fingertips, so you also need to act like it. This means opening drawers with your knuckles instead of your fingertips and not using your nails to open things. Furthermore, nails become extremely delicate with prolonged exposure to water. You can think of wet nails as being similar to wet paper, and therefore much easier to tear. This means you should be washing dishes with gloves on and should always have a layer of nail polish on to prevent your nails from soaking up too much water. I’ll go into detail about how I apply polish in the next steps.


How To do an Oil Change--Miguel


Why pay for an overpriced oil change at a mechanic shop when you can do it yourself!? 

    When the Covid Pandemic hit, we were all forced to stay home and we were strongly urged not to leave. I didn’t mind it, one could even say I LOVED it; staying home, doing nothing all day every day, it seemed perfect to me. My parents, on the other hand, HATED it. They’re people who despise laziness, and have to be doing something at all times; they rarely take some time to relax. And my dad also hates paying people to do a service for him knowing he’s more than capable of doing it himself. He noticed I wasn’t doing anything during the pandemic and that angered him. He decided to teach me how to do many tasks: how to change a tire, how to change a lightbulb, and even taught me what he does for work, replacing a windshield on a car. But my favorite task he taught me was how to do an oil change. All the tasks were beneficial but doing an oil change stood out because it’s much simpler than one thinks.

The TOOLS you will need:

- A car jack 


- 2 or 4 jack stands (personal preference, see Step 2)


- Car creeper (optional) 

- Oil funnel


- An oil tray 

- Oil filter pliers 


- A socket wrench


- A socket (Most cars require a 14 mm socket or a 17 mm socket)


- An oil filter (specific for your car; additional info on Step 1)


- New motor oil for your car (specific for your car; check the engine cap on the engine)


Step 1: 

Acquire all the materials necessary for your oil change before you start. 

You will need: 

- To drive to your local AutoZone and locate the oil filters 

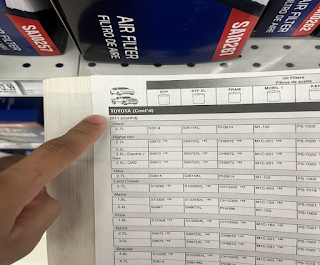
(Here you will find a book with information about what oil filter your car has.) - In the book, find the MAKE of your car, then the YEAR, then the MODEL of your car. 

        - The book is divided into columns and the first and second columns are used to find the oil filter for your car. 

- Locate the oil filter for your car, and purchase it 

*There are two different types of oil filters, a regular oil filter, and an XL oil filter; I recommend the XL because they last longer, but, both work fine. 

- On the engine of your car, you will find your car’s oil type on the oil cap 

        - You can also purchase this at AutoZone 

- You will need to get your car jack, as well as your jack stands (2 or 4) 

        - If you do not have access to these items, you can purchase these at AutoZone; yes, they will most likely be pricy, but, it’s an investment 

- Lastly, your socket wrench, socket, and oil filter pliers 


Step 2: 

Once you have acquired all your materials, this is where the fun begins!

     - Locate the jack points around your car 

    - There should be 2 on each side (front right, back right, front left, and back left), 1 in the front, and 1 in the back 


- First, jack the front of the car, using the car jack, high enough for you to fit under the car 

- Place the jack stands under the front right and front left jack point and once in place, lower the car jack


- Next, jack the back of the car high enough so your car is parallel 

    - Here, you can leave the car jack as it is, parallel, or place the other 2 jack stands under the back right and back left jack points

Step 3: 
Time to get your hands dirty! (I strongly recommend wearing gloves for this part) 
    - Get under your car and locate the oil pan 
- Using the socket wrench and the correct size socket loosen the bolt on the oil pan


- Loosen it enough to unscrew with your hands

- Get your oil tray and place it under the oil pan to catch the old oil 

    - Let it drain for about 10 minutes 

- After the oil pan is drained, loosen the oil filer using your pliers 

    - Again, loosen it enough to unscrew it with your hand 

- Place the oil tray under the filter as most of the time, the filter will leak oil 

    - Let it drain for 5 minutes 


Step 4: 
- Once everything is drained, screw the bolt of your oil pan back using your socket wrench 
- Place your NEW oil filter where the old one was, and using the pliers, screw it back on


Step 5: 
- Lower your car by placing the car jack on the front jack point of your car 
    - Lift your car until it lifts off the jack stands in the front right and front left positions 
- Remove the Jack stands then proceed to lower the car jack 
*After removing the front jacks, repeat the process but instead place the car jack on the back jack point and remove the back left and back right jack points. 

Step 6: 
Hang in there! You’re almost done! 
    - Pop the hood of your car open 
        - To open it, go inside your car and locate the hood lever; then proceed to pull it

- Once open, locate the oil cap on your engine and using your hand, unscrew it 
- Get your oil funnel, and put it right over where you unscrewed the oil cap 
- Carefully pour the oil into the funnel, and ensure that there are no spills 
- To see your cars oil capacity, look in the OWNER’S MANUAL
- Oil capacity is the amount of oil you should be refilling 
- After you fill your car up with the right amount of oil, crew the oil cap back on, close your hood, start the engine, and leave it running for 10 minutes 
After ten minutes, shut it off, and congratulations!! You just completed an oil change!


How to--Arroz Con Leche--Illicity


During the winter or Christmas growing up in a Hispanic household was always my favorite time of the year. To me winter meant grandma's house and all the amazing dishes and dessert she would have ready for us. My all time favorite dessert she would make is Arroz con leche or also known as rice pudding. This dessert was the most amazing thing I have ever tried and what I beg for every year. This dessert is a sweet rice pudding that was brought into the world through the Spanish colonist. It’s a very simple and easy versatile dish that can be eaten at anytime. Arozz con leche or rice pudding is smooth and almost like oatmeal but even better.


Ingredients

 ● water 

● Rice 

● Sugar 

● Cinnamon sticks 

● Cinnamon powered 

● Vanilla extract 

● Evaporated Milk 

● Sweetened condensed milk 

Utensils needed 

● Pot 

● Any spoon 

Step 1: Bring water to a Boil in a large pot, add however much water you would like to make and then add 3 cinnamon sticks. Allow the water to boil as the 3 cinnamon sticks help give the water flavor and just add a little taste. 


Step 2: Once the water has begun to boil u want to remove the cinnamon sticks and add the rice into the pot of boiling water. U can add however much rice you need or would like and let this boil for just a couple mins. This step is really up to you and how much of the pudding you would like to make. 

Step 3: Once you have let the rice boil in the cinnamon water u then want to start adding in the rest of the ingredients. U then add sugar to your liking, condensed milk, and the evaporated milk. These help with the taste of the pudding and how sweet it tastes all together. One can of each milk should be enough but add to your liking. 

Step 4: Once all the ingredients are added u wanna use a spoon or large enough utensil in order to stir all the ingredients together. You wanna make sure you stir constantly and allow all the ingredients to combine together well. Stir for a good few minutes. 

Step 5: When you feel all the ingredients you have added into the water all well stirred you then want to get the lid of the pot and allow the rice and eveything fo st for a few seconds to get the texture of the rice and milk you want. This allows the rice to absorb the flavor of everything. (You want to make sure even after you covered it you keep and eye on it and stir it just so the rice does not burns MAKE SURE TO KEEP ON LOW HEAT) 

Step 6: Finally, once you have checked in on it and you realize the rice has gotten the texture of a thickness you then want to add cinnamon on top for more flavor (as much as you like) and add back the cinnamon sticks from the beginning to give it more taste through the rice. 

This recipe is one of the simplest to follow. Although many may make it differently I enjoy the way my grandma makes it best and the way she has taught me. 

Monday, March 28, 2022

How to become a successful content creator--Antonio

(From someone who isn’t but is working to get there)

Hey there, are you a struggling content creator trying to make it big, trying to get brand deals and make your own mark. Well if are then you may have come to the wrong place but thats fine. I would like to think I have a good grasp on how to lead someone to something I cannot obtain. And the best advice comes from people trying to get there themselves. 

Have you ever thought about creating contain? Maybe you should then, Everyone and their mom knows the internet is the new move. And I am not just going to talk about gaming, you could use this steps to help create what you want. The possibilities are endless as some may say. 

Step one: 

● Decide what you want to do and go do it - Do not hop on a trend because of people are doing it, one of the best pieces of advice I have ever heard has to be do what makes you happy. No one wants to be stuck doing something that they do not like. Even if what you are doing isn’t the most trending thing out there. You will have much more fun doing what you want instead of doing what you think other people want. 

Step two: 

● Be yourself and stand out - More then likely there will be hundreds of people doing what you try and do. Best way to stand out is to be yourself, there is only one of you in the whole world. Don’t be afraid to put yourself out there, people love watching people they relate too or people they find interesting. - There could be multiple ways to stand out, you could come up with a unique catch phrase. For my twitch channel, I like to say “For the Fans,” to me this is my way of reaching out to people that haven’t yet gotten to know me. I have big plans for this, if I ever do make it big. I want this to be staple point in my channel. To me it means that I do what I do to make other people happy. 

We’ll take a quick pause here to give you my credentials for teaching you guys about this topic. I have a astonishing 30 followers on twitch, about 20 sum on tiktok and 5 on youtube. I am proud to say most of those people are family and friends but other people do not know this. 


This is a quick look at what my twitch home page looms like. It is not much but it has some good stuff up there. If you cannot see, I have my own logo which I made for free, a quick bio that welcomes you and some quick links to go follow people on other platforms 
- Some quick tip to do is have multiple platforms, do not limit yourself to just one app or channel. Go crazy posting on other social media. 
- For me, I have my personal twitter account up so people see me. See that I am a normal people that has decided to do this for fun. I have a youtube channel which I provide extra contain on so people can check me out even more 
All of what I have is stuff you can get for free. You can do even better then what I have, but I myself am lazy and choose to deal with my other problems first. Like life 

Step Three: 
● Be patient 
- This is my last step because again, I am no pro yet but I will be so take this steps to heart
- I started this channel about a year ago and I can tell you, growing will take time. It will be hard and there will be time when it feels no one in the world knows your channel exist. But give it time, patient will be your best friend and will help get through these ruff patches
 - Once people start to discover you, talk to them. Make them feel wanted and welcome. That is how you will build a strong community of people that will support you. Once those numbers add up then you will see results, then after you enjoy the ride 

I hope these 3 easy steps helped you, They sure do help me and they can also be added to things other then growing a platform on social media. You can easily add these things to your life and how you do things and you will still see results. When you do remember Tony put you on this. If you liked what you read, go checkout antonio_gall on tiktok, youtube and twitch. I am far from the best but we always laugh and have a great time.


Monday, February 28, 2022

How to Create a Perfect Picnic Date--Mya

 Step 1: The first thing you need to do to start your perfect picnic date, is to find someone(s) to go with. Asking them out can be as simple or as intricate as you want it to be, but it should be in some way special to them. 


Step 2: Create a menu for said date that has yours and theirs favorite food. You always want to start off with a little appetizer, then an easy main dish, and dessert. One of the most important things to consider is how well your food can be transported; if it doesn’t travel well don’t bring it. Unless you have something that can keep your food the exact temperature you want, go with something that tastes good when it’s room temperature. You’ll also need a drink option. Go with something refreshing that pairs well with the food you’re bringing.  

Whatever dishes you decide to serve, try to stray away from anything with seafood, pastas, and anything super heavy on the dairy. Seafood will not be the right temperature no matter what you do and will make everything else smell and kind of taste like it unless you keep it completely separated and eat it right away; which is just a hassle. While pasta can be transported pretty easily, the noodles will get hard and taste undercooked, while any sauce you put it in will start to solidify to the point where it just doesn’t seem appetizing. Anything that has too much dairy in it will just taste straight up gross if you eat it outside after it’s been room temperature for a while. 


Step 3: Now you need to pick out where you want to have your picnic. A little hike before you have your picnic is a cute idea, but you need to take into consideration whether or not you want to carry everything with you. Any outdoor area that is somewhat secluded will work great. However, make sure the person(s) that you’re going with doesn’t have allergies; or bring allergy medicine if they do. The best place to go, in my opinion, is a park that has an open grass area surrounded by trees. That way the trees keep you in the shade while also making sure you aren’t just out in the middle of the grass where everyone can see you. 


Everything else you’ll need: You’ll need a large towel and a blanket to sit on. Make sure to put the towel down first and layer the blanket on top so that your blanket won’t get stains, and it’ll be way more comfortable to sit on two layers of material instead of one. If you want to be really fancy you can even bring a couple pillows too. Depending on where you’re going, bug spray may just be your best friend. A picnic basket is adorable and pretty standard, however; if you don’t feel like serving little red riding hood, any bag will work. An insulated bag will probably work the best when it comes to transporting the food and the drinks to keep everything at the perfect temperature.


Example of a Perfect Menu


Drinks: Sparkling water in any flavor, except for grapefruit, and some regular unflavored water are the perfect drinks. Both go with everything and won't make you feel too full after you drink them. 


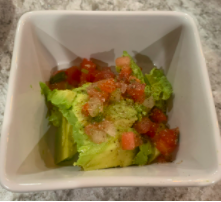
Appetizer/Starter: Tortilla chips and guacamole is always a great starter for any meal. Guacamole can be so easy to make so you can make something from scratch without having to be a master chef. All you need is to cut up an avocado mash in some premade salsa, cilantro, pepper, garlic salt, and lime juice in order to have a simple but fantastic guacamole. A good alternative is also humus with sides of vegetables and pita bread. Also, fruit is always a great addition to any meal. 

Main Dish: A brie grilled cheese sandwich with turkey and apricot jam is a great choice for your entree. The sandwich tastes good even after it’s cooled down and is pretty easy to make but looks like an intricate food. All you need to do is toast two pieces of sourdough bread in a pan with a little bit of olive oil. Once the first side is heated up, flip the bread and add your apricot jam to both pieces of bread. On one side add the brie to your desired taste while also searing some slices of turkey in a pan. Add the turkey on the piece of bread that doesn’t have any cheese on it. Once the cheese is melted and the bread is toasted add a few drops of honey and a pinch or two of salt onto the brie. Finally, combine the two pieces of bread together to create your sandwich. If you want to make the sandwich vegetarian, you can swap out the turkey with thinly sliced apple that has been seared in a pan.  


Dessert: Brown butter chocolate chip cookies are quite possibly the best cookies ever and are the easiest thing to transport on a picnic. My preferred recipe involves combining 1 stick of browned butter into a bowl of 4 tablespoons of room temperature butter. Next, stir in ¾ cup of granulated sugar, ¾ cup of brown sugar, 1 tablespoon of vanilla extract, and ¾ teaspoon of salt. (Tip: when making a dessert that is somewhat rich and doesn’t have any fruity flavors, using maple syrup as well as vanilla extract really adds something to the overall taste.) Once the ingredients are well combined, whisk in 1 large egg and 1 large egg yolk until the mixture is no longer separated. Then, create a flour mixture made with 2 cups of flour, 1 teaspoon of baking powder, and ½ a teaspoon of baking soda. Incorporate the flour mixture into the butter mixture until a dough is formed. Finally, add in 8 oz. of whatever chocolate you want and your cookie dough is complete. Bake the cookies at 350oF for 8-10 minutes and you’re done.   


Monday, January 31, 2022

The Pina Colada--Frankie

 The best drink of all time, the Piña Colada. Literally meaning, “strained pineapple,” this drink is creamy, refreshing, and most importantly, delicious. I could drink these for breakfast, lunch, dinner, dessert, midnight snack…you get the point. Unfortunately, they are not as simple to make like a Shirley Temple, but that does not mean they are complicated. The recipe provides so much room for error that the only way you can mess it up is by getting the wrong ingredients. 

So, onto the ingredients: 

- Cream of Coconut 

- Pineapple Juice

 - Frozen Pineapple Chunks 

- A Lot of Ice 

- (Optional) Coconut or Pineapple Rum 

- (Optional) Maraschino Cherries 

Remember how I said that the only way you can mess up is getting the wrong ingredients? 

- Cream of Coconut is by far the most important ingredient, and the most easily missed. It is important to ensure that you get cream of coconut and not coconut cream or coconut milk. This ingredient cannot be substituted at all. Personally, I prefer Coco Reál because it comes in a bottle that can be opened and closed as much as you’d like. 

- Pineapple Juice is another vital ingredient, but has a way to be substituted. If you choose to get fresh pineapple instead of frozen, you can triple the amount of pineapple added to get the same effect as pineapple juice, but it will make your drink pulpy.

- As mentioned previously, frozen pineapple can be substituted for fresh pineapple. I prefer buying frozen pineapple as it’s cheaper and I also like my drinks to be icy. However if you choose to buy fresh canned pineapple, the can usually contains pineapple juice to hold the fruit. 

- I don’t drink alcohol and never will, but a Piña Colada is commonly an alcoholic drink and so many will enjoy the addition. Here you have two choices between coconut rum and pineapple rum depending on the tastebuds of the drinker whether they like more coconut or pineapple taste. I do not recommend using a plain rum as it can taste too strong in the drink. 

Tools: 

- Strong Blender 

- Measuring Cup 

- Stirring Spoon

 - Drinking Glass 

16oz Piña Colada Recipe: 

Measure out ½ cup of cream of coconut and add to the blender. 

I recommend doing this step first. Since the cream of coconut is a thick syrup, that means it is difficult to get all of it out of the measuring cup and into the blender even when using a spoon. By doing this first, it means that when pineapple juice is added, the cream of coconut will come out too. If you prefer a coconutty taste, you can add one or two more spoonfuls of the cream while leaving pineapple juice at just ½ cup. I like to add three.


Measure out ½ cup of pineapple juice and add to the blender. 

Try to get out the remaining cream of coconut by adding this to the same measuring cup. If you prefer a pineapple taste, you can add one or two more spoonfuls of pineapple juice while leaving the amount of cream at just ½ cup.

Measure out ½ cup of frozen pineapple chunks and add to the blender.
I say to add ½ cup of pineapple to be exact, but it is always much easier to add just a handful which usually comes to around ½ cup.
Measure out 1½ cup of ice and add to the blender. 
Ice usually comes with a bit of variation. For me, this is the exact amount of ice to make the colada thick, but not too thick. If you want it thinner, add less ice, around 1 cup. If you want it thicker, add more ice, around 2 cups. However, if you choose to add fresh pineapple chunks instead of frozen, you will always need more ice. Also, if you choose to add alcohol, you will once again need more ice. A basic rule for this would be to add ½ cup of extra ice to each thickness level for each change. I also recommend adding cubed ice instead of crushed ice, it also contributes to a thicker drink.


(Optional) Measure out 3oz of flavored rum. 

Once again, choose the rum to your liking. Coconut rum adds a stronger coconut taste, but pineapple adds a stronger pineapple taste. This is always an optional step and the drink will taste great regardless. Always remember to drink responsibly and only when you are of age. 

Blend, blend, blend. 

Once everything is in the blender, turn it on to a medium speed for about a minute. Pay attention to the blender and take your time, but not too much time as it could cause the Piña Colada to become a piña liquid, not fun. If your blender only has two speeds, set it on high and do constant checks till you reach the desired thickness.


Serve. 

Depending on your desired thickness, serving can be a breeze or extremely difficult. If it does not pour out, open the lid and use your spoon to scoop out the drink into a nice glass.

(Optional) Garnish. 

Using the maraschino cherries and a spoon, serve two cherries onto the top of the drink. Since it is icy, they will not sink and instead rest on the top. To go even further, take a spoonful of the maraschino syrup and drizzle it on top gently so it does not mix.

Enjoy. 

The taste is always doubled when you make it yourself. Take a seat and relax. Sip on your drink slowly and let it melt on your tongue so that the flavors are slowly released. You deserve this.